Jewelry is the hardest product category to retouch. Polished metal reflects the whole room, gemstone facets go flat under the wrong light, and the fine metalwork that holds a stone disappears the moment an editor over-smooths. This guide covers how to retouch jewelry photos the right way — what “correct” looks like for metal, gemstones, settings, and backgrounds — and then shows the entire process done live, step by step, inside a jewelry-trained AI.
You can do every edit here by hand in Photoshop, or let an AI jewelry retoucher do it in about a minute. We’ll cover the craft first so you can judge the result either way, then walk through the fast version. The walkthrough comes from Alex Koloskov, a product photographer with 20+ years behind the camera and co-founder of NeuroViz. For the bigger picture of how AI retouching fits a brand’s whole catalog, start with our complete guide to AI jewelry retouching.
Why is jewelry so hard to retouch?
Jewelry is uniquely difficult because polished metal and cut gemstones behave like mirrors — they reflect their surroundings instead of simply absorbing light, so every imperfection and every clumsy edit becomes immediately visible. A plain ceramic mug can be brightened with one curves move and look fine. A platinum band under the same treatment shifts blue, blows out its highlights, and loses the grain that makes it read as metal.
Three things break in nearly every failed jewelry retouch, and they’re the four sections that follow:
- Metal tone and highlights — blown specular hotspots or color casts that turn metal to plastic.
- Gemstone facets — stones that go gray because the “play of light” was smoothed away instead of clarified.
- Setting and prong geometry — the fine metalwork erased by over-aggressive smoothing.
This is also why generic AI editors fail on jewelry: they were trained on broad e-commerce products and never learned how metal and faceted stones actually behave. A jewelry-specialized model is trained on exactly that — which is the difference you’ll see in the walkthrough below.
How to retouch metal: gold, silver, and platinum highlights
The goal with metal is to control specular highlights without flattening them — a clean, directed reflection that reads as the material, not a blown-out white blob and not a dull matte surface. Gold, silver, and platinum each reflect light differently, and the edit has to respect that.
- Gold (yellow and rose) carries a warm cast that must survive the edit. The classic mistake is brightening the whole piece until the highlights clip to pure white, which kills the warmth that identifies the metal. Pull the highlights down with a highlight-specific adjustment so the hotspot stays bright but still slightly golden.
- Silver and white gold are cooler but should never read as gray — a narrow tonal range, deep enough to show form and bright enough to look polished, with the specular peaks protected.
- Platinum is the most neutral, almost blue-white. Warm it even slightly and it reads wrong; its giveaway is a finer, more mirror-like finish than silver.
Reflections are where most editors go wrong. A ring picks up the backdrop, the tent, and the photographer — those need cleaning, but a polished surface with no reflection reads as matte plastic. The skilled move is to simplify and direct reflections, not erase them. One honest caveat: a hard, overexposed white patch on the back of a band can read as “no metal there at all,” and software can’t always tell a blown highlight from a blown-out background. Those clipped areas are the toughest recovery in the whole job.
How to retouch gemstones: facets, sparkle, and color
The goal with gemstones is to clarify the play of light through the facets so the sparkle looks like it comes from inside the stone — never painted on top. Over-brightening is the cardinal sin: push a stone too bright globally and it loses the shadow zones that define its 3D facet structure, flattening into an illustration.
Done right, gemstone retouching is local work:
- Clarify the facets — raise micro-contrast inside the stone so each facet reads as a distinct plane.
- Restore sparkle selectively — brighten the brightest facets while protecting the dark ones, never a global push.
- Remove dust and surface specks tastefully — clean what wouldn’t be visible to the naked eye, without misrepresenting a real structural inclusion.
- Correct color — bring a ruby that photographed orange under tungsten back to its true deep red, against a known reference rather than a generic preset.
There’s a judgment call buried in this step that separates amateurs from professionals: how much you should touch the stone at all. On a low-value or poorly shot gem, enhancing it is a win. On an expensive feature stone, altering its appearance changes how its quality reads — and that’s never a good trade. We’ll see exactly how the tool exposes that choice in the walkthrough. Shooting the stone well in the first place reduces all of this work; how to photograph jewelry for Etsy covers the angles and lighting that capture facet sparkle in-camera.
How to preserve the setting: prongs, bezels, pavé, and engraving
Setting detail is the most frequently destroyed element in over-processed jewelry retouching — and the hardest to recover once it’s gone. Prongs, micro-pavé beads, milgrain, and engraving are physical 3D structures at sub-millimeter scale. The macro lens reveals them; a careless edit erases them.
The typical failure is running a skin-smoothing or texture-reduction pass (or an AI trained on faces) over a piece of jewelry: the tool reads the fine metalwork as “noise” and wipes it, leaving a smooth blob. The correct approach is the opposite — sharpen, don’t soften:
- Prongs and bezel edges: each prong should read as a discrete claw with a highlight edge — targeted sharpening, not a global blur.
- Pavé: the micro-beads between stones need sharpening at 100% zoom, never smoothing.
- Engraving: protect engraved grooves from any global brightening — the groove’s contrast is what makes it visible.
- Filigree and milgrain: the highest-complexity detail; minimal global editing and surgical local work, because a mistake here can’t be undone without going back to the raw file.
This is the category where a skilled human retoucher still genuinely earns their rate on the most intricate pieces. For routine catalog production, jewelry-trained AI handles standard prong-and-bezel settings well — we break down exactly when each makes sense in jewelry retouching services vs AI.
How to fix the background: white, shadow, and catalog consistency
A clean cutout and a correct background are the last step — and the one buyers notice most. Most marketplaces expect pure white or a very light neutral; anything that drifts above a clean white reads as “dirty” and fails Amazon’s main-image requirement.
There are two valid routes, and the choice is editorial:
- Solid pure white — a perfectly clean cutout with no shadow, for marketplaces that demand a flat white field.
- Natural shadow — keep a soft, realistic cast shadow under the piece, the way a real photographer’s table shot looks. A piece floating on a pure-white void often looks more artificial than the same piece with a natural shadow.
Cutout accuracy matters most at the edge — the mask has to follow every prong tip and bezel edge. And across a catalog, the background, shadow style, brightness, and metal tone all have to match: a buyer scanning a collection notices inconsistency before they consciously register it. That last point — consistency at volume — is where automation pulls decisively ahead of any manual process, as the walkthrough shows next.
Doing all of this automatically: a step-by-step walkthrough in NeuroViz
Every edit above can be done by hand in Photoshop — but a skilled retoucher needs roughly 20–40 minutes per image, and keeping a 500-piece catalog perfectly consistent across that many edits is hard. A model trained specifically on jewelry does the same work in about a minute, with the same settings on every image.
Here’s exactly how it works, demonstrated by Alex Koloskov in the AI jewelry retoucher. You can follow along for free — every new account starts with 80 credits, no card required — so the steps below double as a hands-on tutorial you can repeat on your own photos.
Step 1: Open the retoucher and upload a photo
Go to neuroviz.ai and open the AI Jewelry Retoucher. If you don’t have an account yet, registering gives you 80 free credits — enough to work through this whole walkthrough. When you first enter, a built-in onboarding tutorial walks you through the interface, so you don’t have to memorize anything here. Upload your raw photo to begin — it can be anything from a studio shot to a quick phone snap.
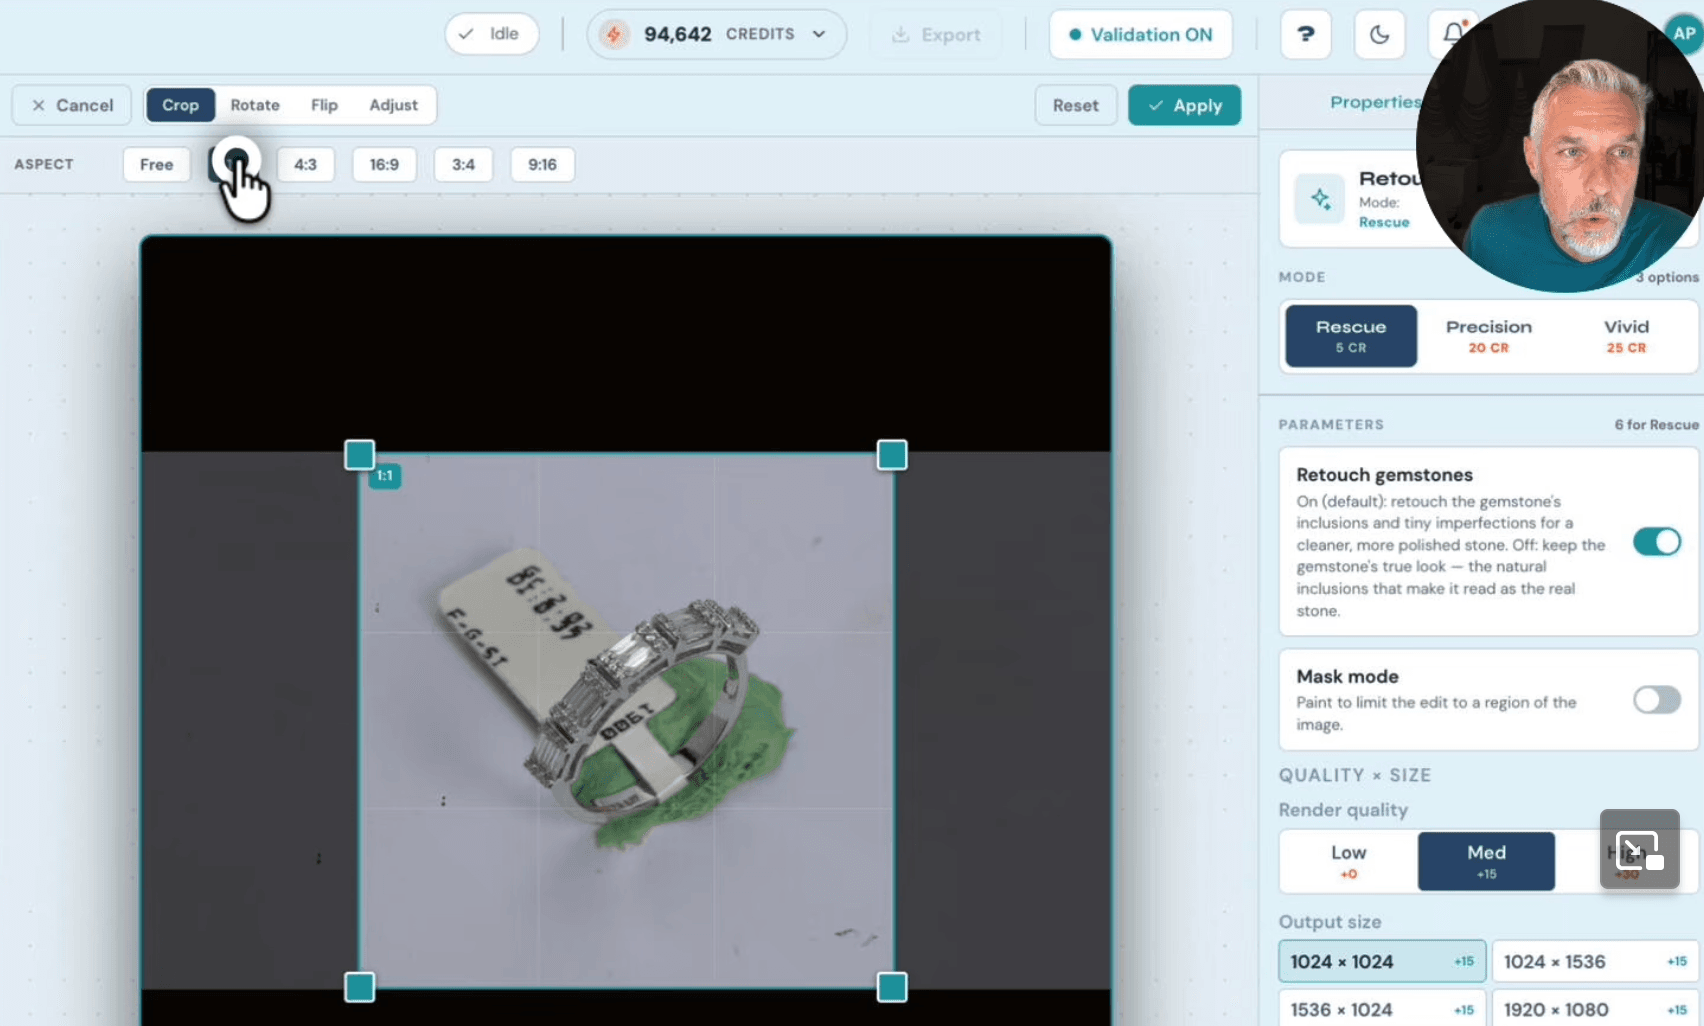
Step 2: Crop and frame the piece
Before retouching, crop. A 1:1 square crop is the safe default for marketplace listings, and cropping in also brings the camera closer to the actual item. The built-in editor also lets you rotate, flip, and adjust brightness or saturation — but on a decent photo, leave those alone and just set the crop.
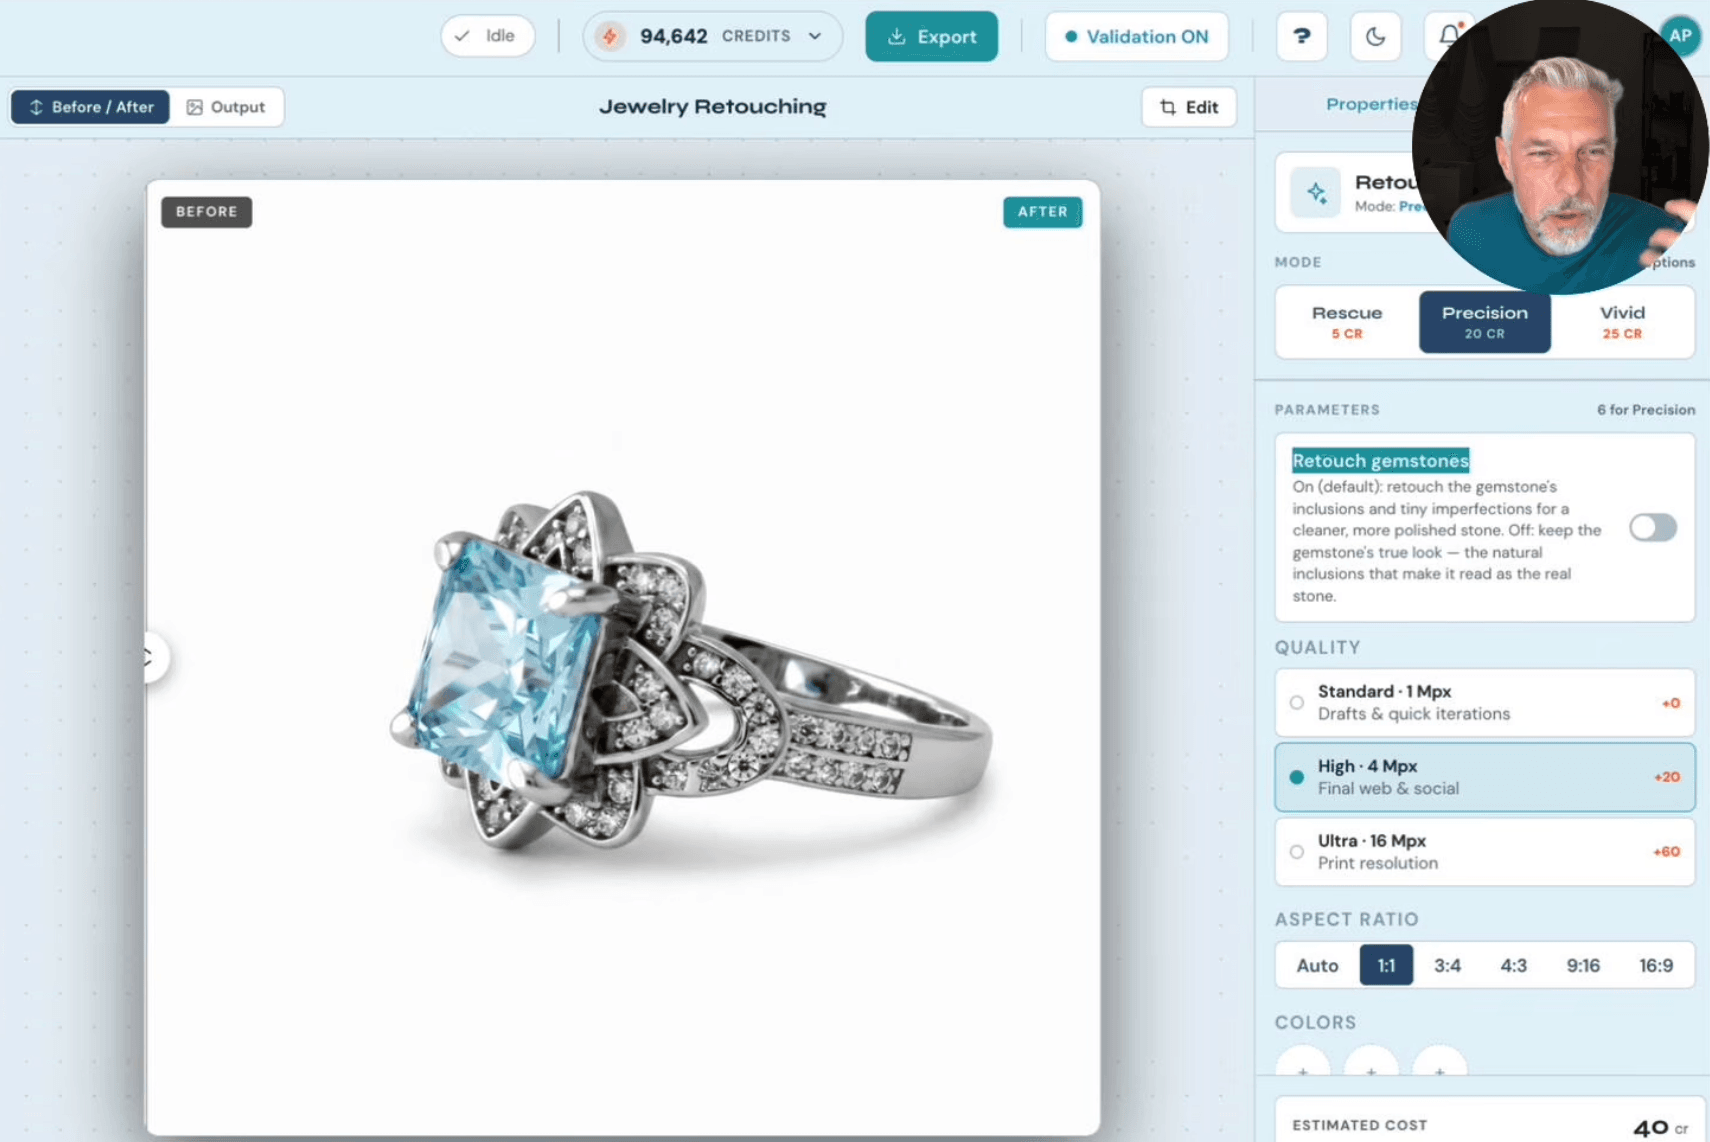
Step 3: Choose the mode that matches your photo — Rescue, Precision, or Vivid
The retoucher offers three modes, each tuned to a different starting photo. This is the decision that most affects your result:
| Mode | Best for | Keeps the framing pixel-exact? |
|---|---|---|
| Rescue | Bad phone shots — blur, soft focus, low detail, messy background | No — it reframes the piece to fill ~70% of the frame, and on very poor inputs can slightly alter tiny engraving (a worn “14K” stamp) |
| Precision | Photos that are already decent and need clean, faithful retouching | Yes — pixel-to-pixel, preserves every detail |
| Vivid | Hero and marketing images that want richer, more saturated color | Mostly — a punchy niche look that can shift the angle a little |
In short: Rescue rescues a photo you’d otherwise reshoot, Precision is the everyday production tool for good photos, and Vivid is a styling choice for marketing shots. One practical note for Precision — props, tags, and stuck-on price labels can confuse it, and the fix is a short text prompt telling it to remove them.
Step 4: Make the gemstone decision — the “Retouch gemstones” toggle
This is the professional judgment call from the gemstone section, turned into a single switch. The “Retouch gemstones” toggle controls whether the model actively cleans and enhances the stones:
- On (the default) — the model enhances the stones. It’s on by default because roughly 60% of inputs are lower-quality photos where the gems genuinely need help, and it’s also what you want when a modest stone needs to look more premium for a listing.
- Off — the model leaves the stones almost untouched, preserving their real facets and natural character. Turn it off for expensive pieces and large feature stones, where you want the gem represented exactly as it is. With the toggle off it still touches the stone a little, but it keeps the original faceting intact.
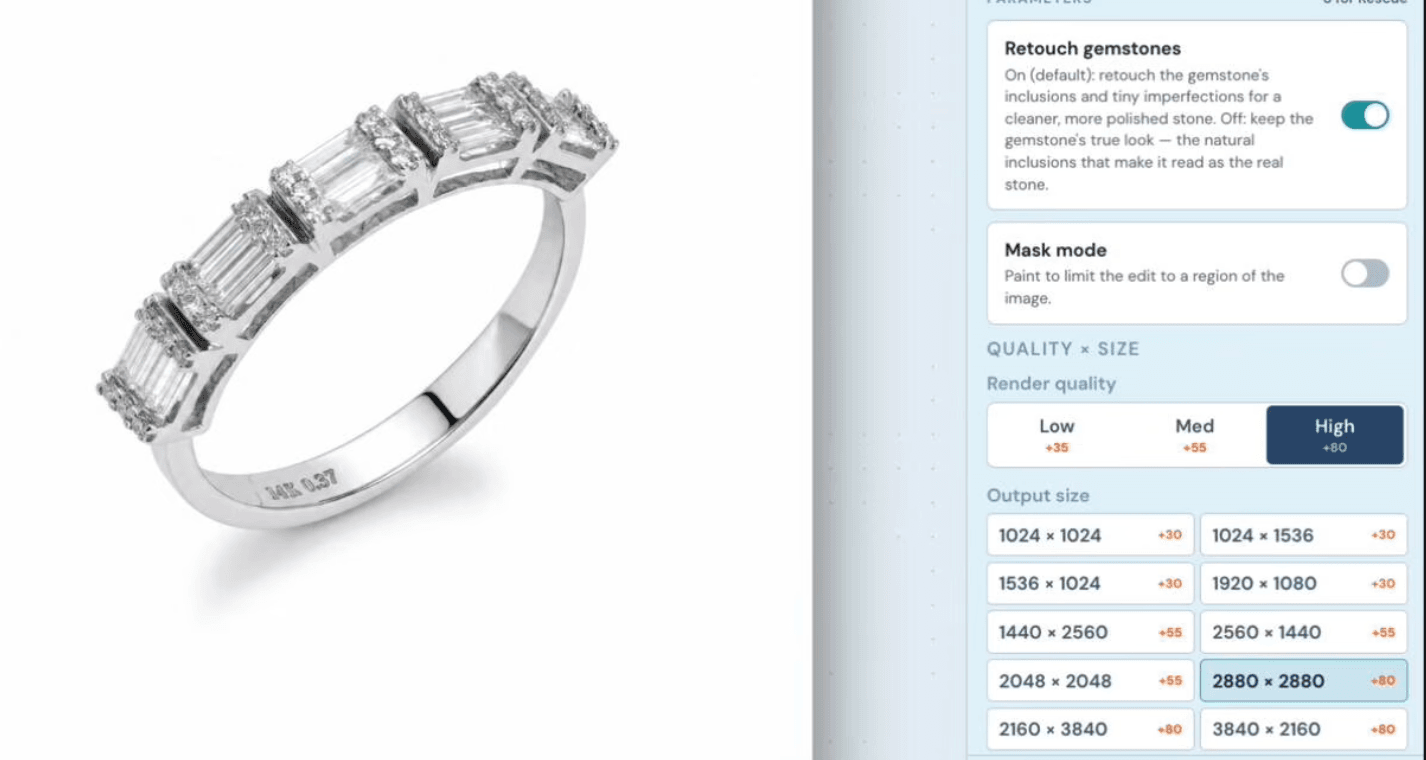
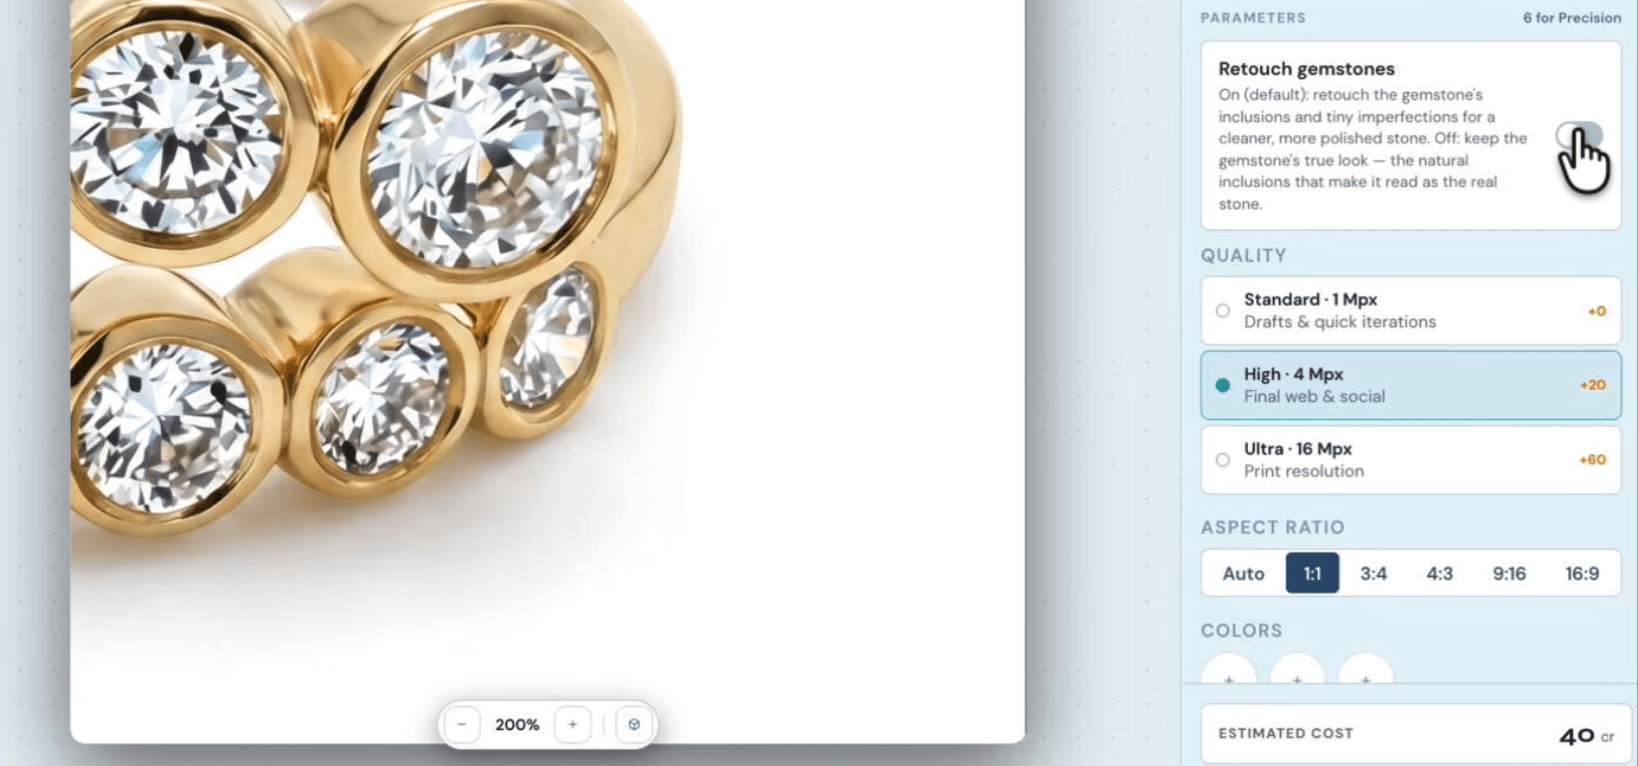
Step 5: Set resolution, quality, and background
Pick your output resolution — higher resolution costs more credits, so match it to where the image will be used (a 4-megapixel “high” output is plenty for most listings; “ultra” is for zoom-heavy product pages). Then choose the background: solid pure white for a flat marketplace field, or keep the natural shadow for a photograph that reads as real. PNG keeps the background clean either way.
Step 6: Validate, then generate
Before spending credits, the retoucher validates the photo and flags anything that confuses a retoucher — a piece mounted on a prop, a stuck-on price tag, or a shallow depth of field that left part of the ring soft. A warning isn’t an error: you review it and can proceed, and on complex props the fix is often a quick prompt plus a slightly lower resolution. At the highest settings a generation takes up to a minute; lower settings are faster.

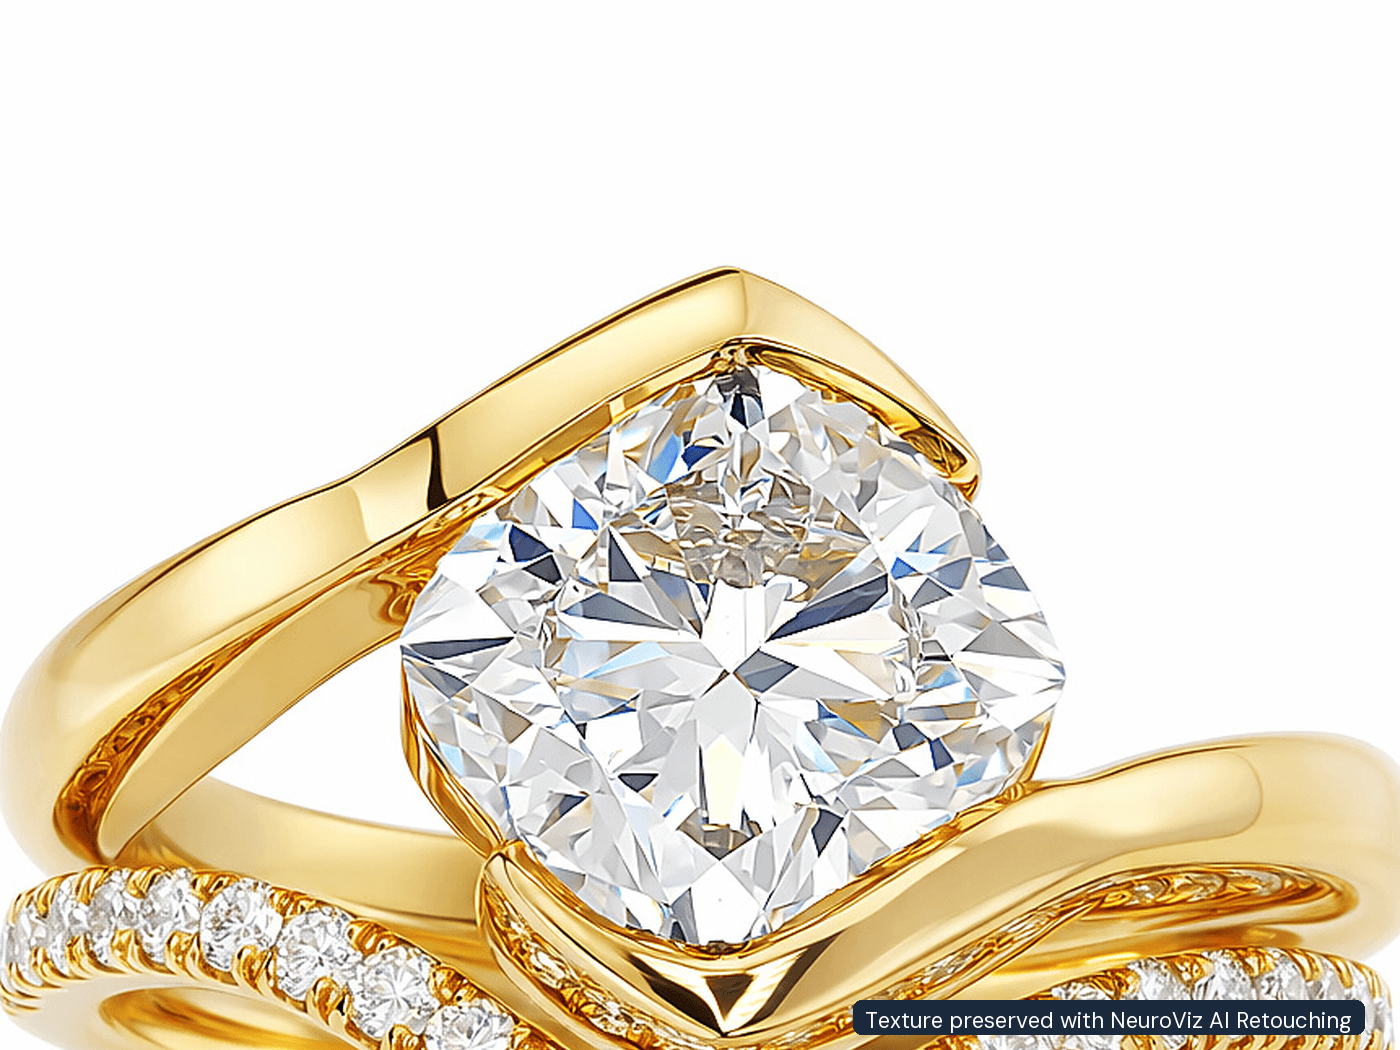
Step 7: Review the before/after — and reuse the result
Every result opens in a built-in before/after view (the image at the top of this article is exactly that), so you can confirm the edit held up at 100% zoom. From there, you don’t have to re-upload anything: a “use result in” button hands the finished image straight to the video creator (a 360° product spin from one image) or the virtual try-on (the piece placed on a model). Retouch once, then produce the listing photo, the video, and the on-model shot from the same asset.
When is a human retoucher still worth it?
For routine catalog production, jewelry-trained AI now does what most brands needed a retoucher for — but a skilled human still wins on the most intricate or art-directed work. Reserve hand-retouching for complex filigree and pavé where every micro-bead matters, and for hero or campaign images that need true art direction. For everything else — clean backgrounds, metal-tone correction, gemstone clarity, and catalog consistency at volume — AI is faster and far cheaper, and it never drifts between images.
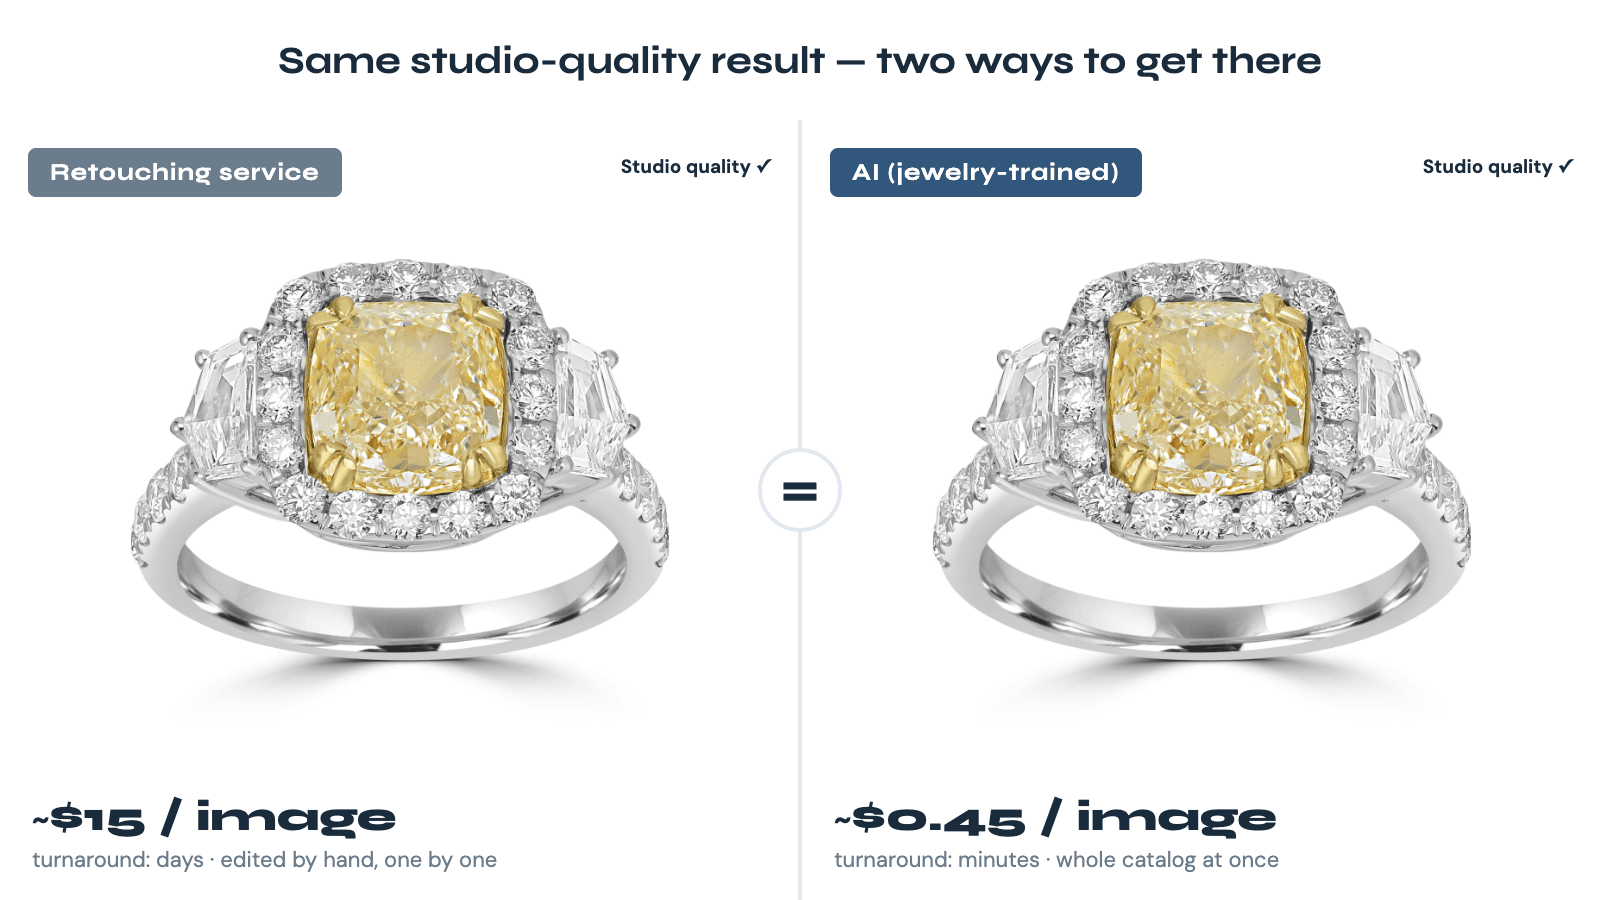
On cost: a retouch runs roughly 25–80 credits depending on mode and resolution — about $0.50 to $1.50 per image at typical settings, depending on your credit pack. A professional service typically charges around $8 per image and $15–$50+ for complex pieces. On a 500-image catalog that’s roughly $350–$500 with AI versus $4,000+ with a service. If you’re choosing tools, our roundup of jewelry photo editing options compares the field; the full cost-speed-quality breakdown lives in jewelry retouching services vs AI.
About this walkthrough
This guide follows a full jewelry-retouching tutorial by Alex Koloskov, co-founder and CEO of NeuroViz. Alex is a professional product photographer with more than 20 years of experience and the founder and lead instructor of the Photigy School of Photography, where photographers and jewelers worldwide have studied product and jewelry lighting for over a decade. NeuroViz’s retouching models are trained on 50,000+ jewelry images and used by 500+ jewelry businesses.
Watch the full tutorial: see every step in Alex’s complete jewelry-retouching walkthrough on YouTube —
.
Ready to try it on your own pieces?
Upload a few of your real products to the AI jewelry retoucher and compare the output to what you’re getting now. Start free with 80 credits — no credit card required. When you’re ready to run a full catalog, Batch Processing is included with Pro Membership at $29/month, along with Smart Retry (re-run a generation at one-third the cost) and credits that don’t expire while your membership is active.
Updated June 2026. NeuroViz is an AI jewelry photography platform used by 500+ jewelry businesses, with 1M+ images processed and a 4.9/5 rating.