To photograph jewelry for Etsy, you need four things: diffused light (a window works), a clean background, a stabilized phone or camera with macro focus, and consistent editing. Shoot at least 2,000 pixels on the shortest side, fill as many of Etsy’s 10 photo slots as you can, and make the first photo a bright, tightly-cropped hero shot — that’s the thumbnail buyers see in search. This guide walks through every step, including the exact Etsy requirements for 2026 and the editing workflow that takes minutes instead of hours.
We process jewelry photos for a living — NeuroViz, an AI jewelry photography platform, has handled 1M+ images for 500+ jewelry businesses, many of them Etsy sellers. Everything below comes from what actually works on real listings.
What are Etsy’s photo requirements in 2026?
Etsy allows up to 10 photos and 1 video per listing, and recommends images of at least 2,000 pixels on the shortest side. Here are the current specs (verified June 2026):
| Spec | Etsy requirement / recommendation |
|---|---|
| Photos per listing | Up to 10 + 1 video |
| Image size | At least 2,000 px on the shortest side (2000×2000 square is the safe default) |
| Resolution / color | 72 PPI, sRGB color profile |
| File format | JPG, PNG, or GIF (non-animated); keep files under ~1 MB for fast loading |
| Search thumbnail | Cropped to roughly 570×456 (5:4 landscape) — adjustable in the listing editor |
| Video | 5–15 seconds, plays silently, max 100 MB, at least 1080 px recommended |
Two practical consequences sellers miss:
- The thumbnail crop is landscape. If your hero shot is a tall portrait image, Etsy’s search thumbnail will chop off the top and bottom. Compose your first photo with the piece centered in a horizontal “safe zone,” then fine-tune the crop in the listing editor.
- Zoom needs pixels. When a buyer clicks to zoom, a 1,200 px image turns to mush. Shoot big, export at 2,000 px+, and let Etsy downscale.
What equipment do you need? (A phone is enough)
You do not need a professional camera to photograph jewelry for Etsy — a phone from the last few years, window light, and a $10 white backdrop produce listing-quality photos. Budget tiers:
| Budget | Setup |
|---|---|
| $0 | Phone, a window with indirect light, white printer paper as a sweep, a stack of books as a tripod |
| Under $50 | Phone tripod with remote (~$20), foam boards for bouncing light (~$10), museum putty to prop rings (~$5), microfiber cloth + gloves |
| Under $200 | Add a small lightbox (Foldio-style) or two diffused LED panels, plus a cheap LED pen light for the sparkle trick below |
The single highest-impact purchase isn’t a camera — it’s a tripod. Macro shots magnify hand-shake, and stabilizing the phone instantly sharpens every photo.
Step 1: Set up lighting that makes metal and stones look real
The rule for jewelry lighting: soft, diffused light for the metal, plus one small point light for the stones. Harsh direct light creates blown-out white spots on metal; pure shadowless light makes diamonds look gray and dead.
- Window light is the default. Place your setup beside (not in front of) a large window with no direct sun. North-facing windows give the most even light all day.
- Diffuse everything. If the light is harsh, tape baking paper or a white sheet over the window. In a lightbox, the walls do this for you.
- Bounce the shadows. Put a white foam board opposite the window so the shadow side of the piece doesn’t go black.
How do you make diamonds and gemstones sparkle in photos?
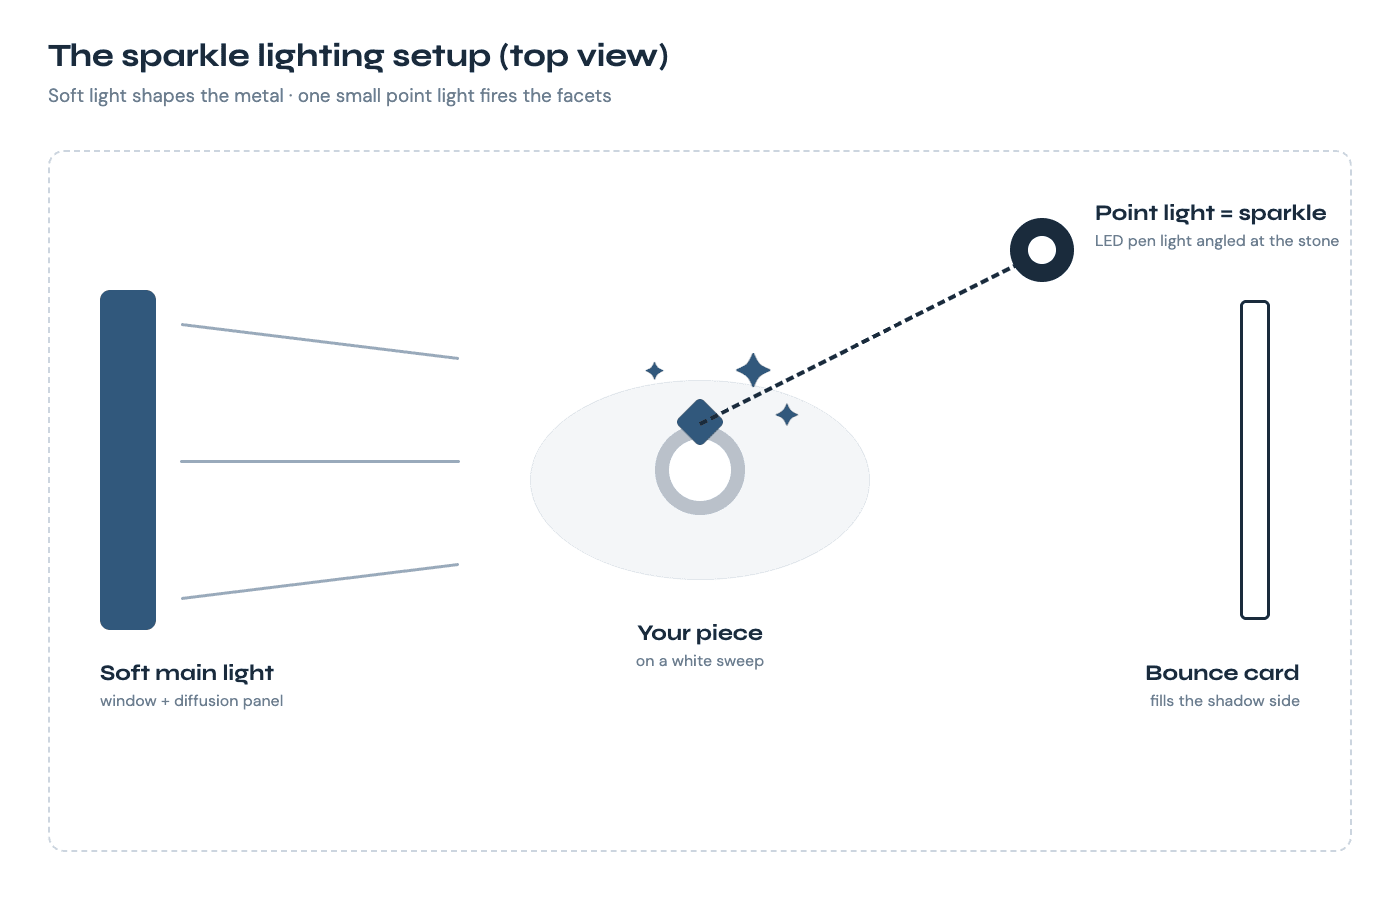
Sparkle comes from one small, hard light source hitting the facets at an angle — diffused light alone kills it. This is the step most guides skip, and it’s why so many lightbox photos of diamonds look gray.
- Light the piece with your soft main light (window or lightbox) so the metal looks smooth.
- Add a single small point light — an LED pen light, a phone flashlight, even a bare bulb — a few feet away, angled at the stone.
- Move the point light slowly while watching the screen: at certain angles the facets fire with white and colored flashes. Shoot at that angle.
- Clean the stone first. A surprising share of “my diamond looks dull” problems are fingerprints — handle finished pieces with gloves or a cloth.
For gold and silver bands: “tent” the piece by surrounding it with white paper or card so the metal reflects clean white instead of your room (and you). Slide a strip of black card near the edge of the frame to create a dark reflected line that defines the metal’s shape — that’s the trick behind expensive-looking band shots.
Step 2: Phone and camera settings for tack-sharp jewelry photos
Lock focus on the front of the piece, drop the exposure slightly, and never use digital zoom.
- Use macro mode (most phones since ~2021 have it) or the 2x/3x telephoto lens. The wide lens up close distorts rings into ovals.
- Tap to focus on the most important detail (the stone, the clasp, the engraving), then slide exposure down a touch — slightly darker photos preserve highlight detail on metal, and you’ll brighten the background in editing.
- Use a timer or remote so pressing the shutter doesn’t shake the phone.
- On a real camera: f/8–f/11 for depth, ISO 100–400, shutter speed handled by the tripod.
The 10 shots every Etsy jewelry listing needs
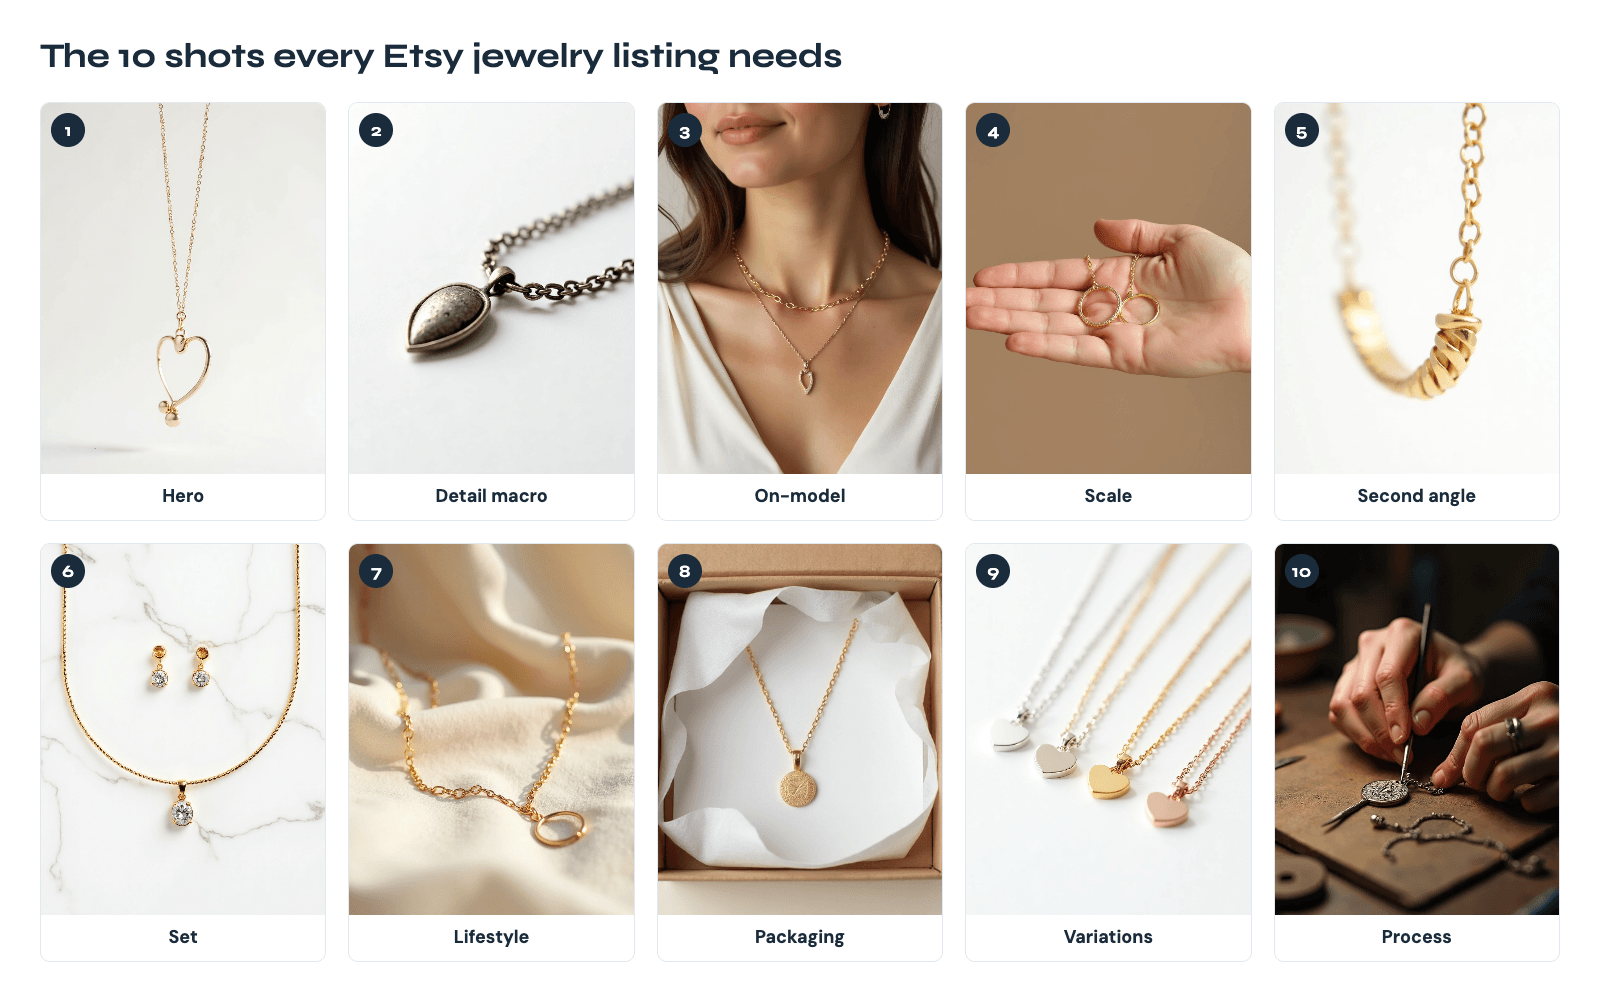
Listings that fill all 10 photo slots convert better than listings with 3 photos — buyers can’t pick the piece up, so photos do the touching for them.
- Hero — clean white/neutral background, fills the frame, landscape-safe crop (this is your thumbnail)
- Detail macro — the stone, texture, or signature element up close
- On-model — the piece worn, for instant size and style context
- Scale — next to a coin or in a hand, so nobody is surprised by size
- Angle 2 — side or back, showing clasp/setting/band profile
- Group/set — matching pieces together (if applicable)
- Lifestyle — styled scene matching your brand (velvet, linen, stone)
- Packaging — your box or pouch; gift-buyers need this
- Variations — color/metal options in one frame
- Story/process — your bench, hands at work, or materials (Etsy buyers reward handmade context)
Model shots vs flat lay: which sells better on Etsy?
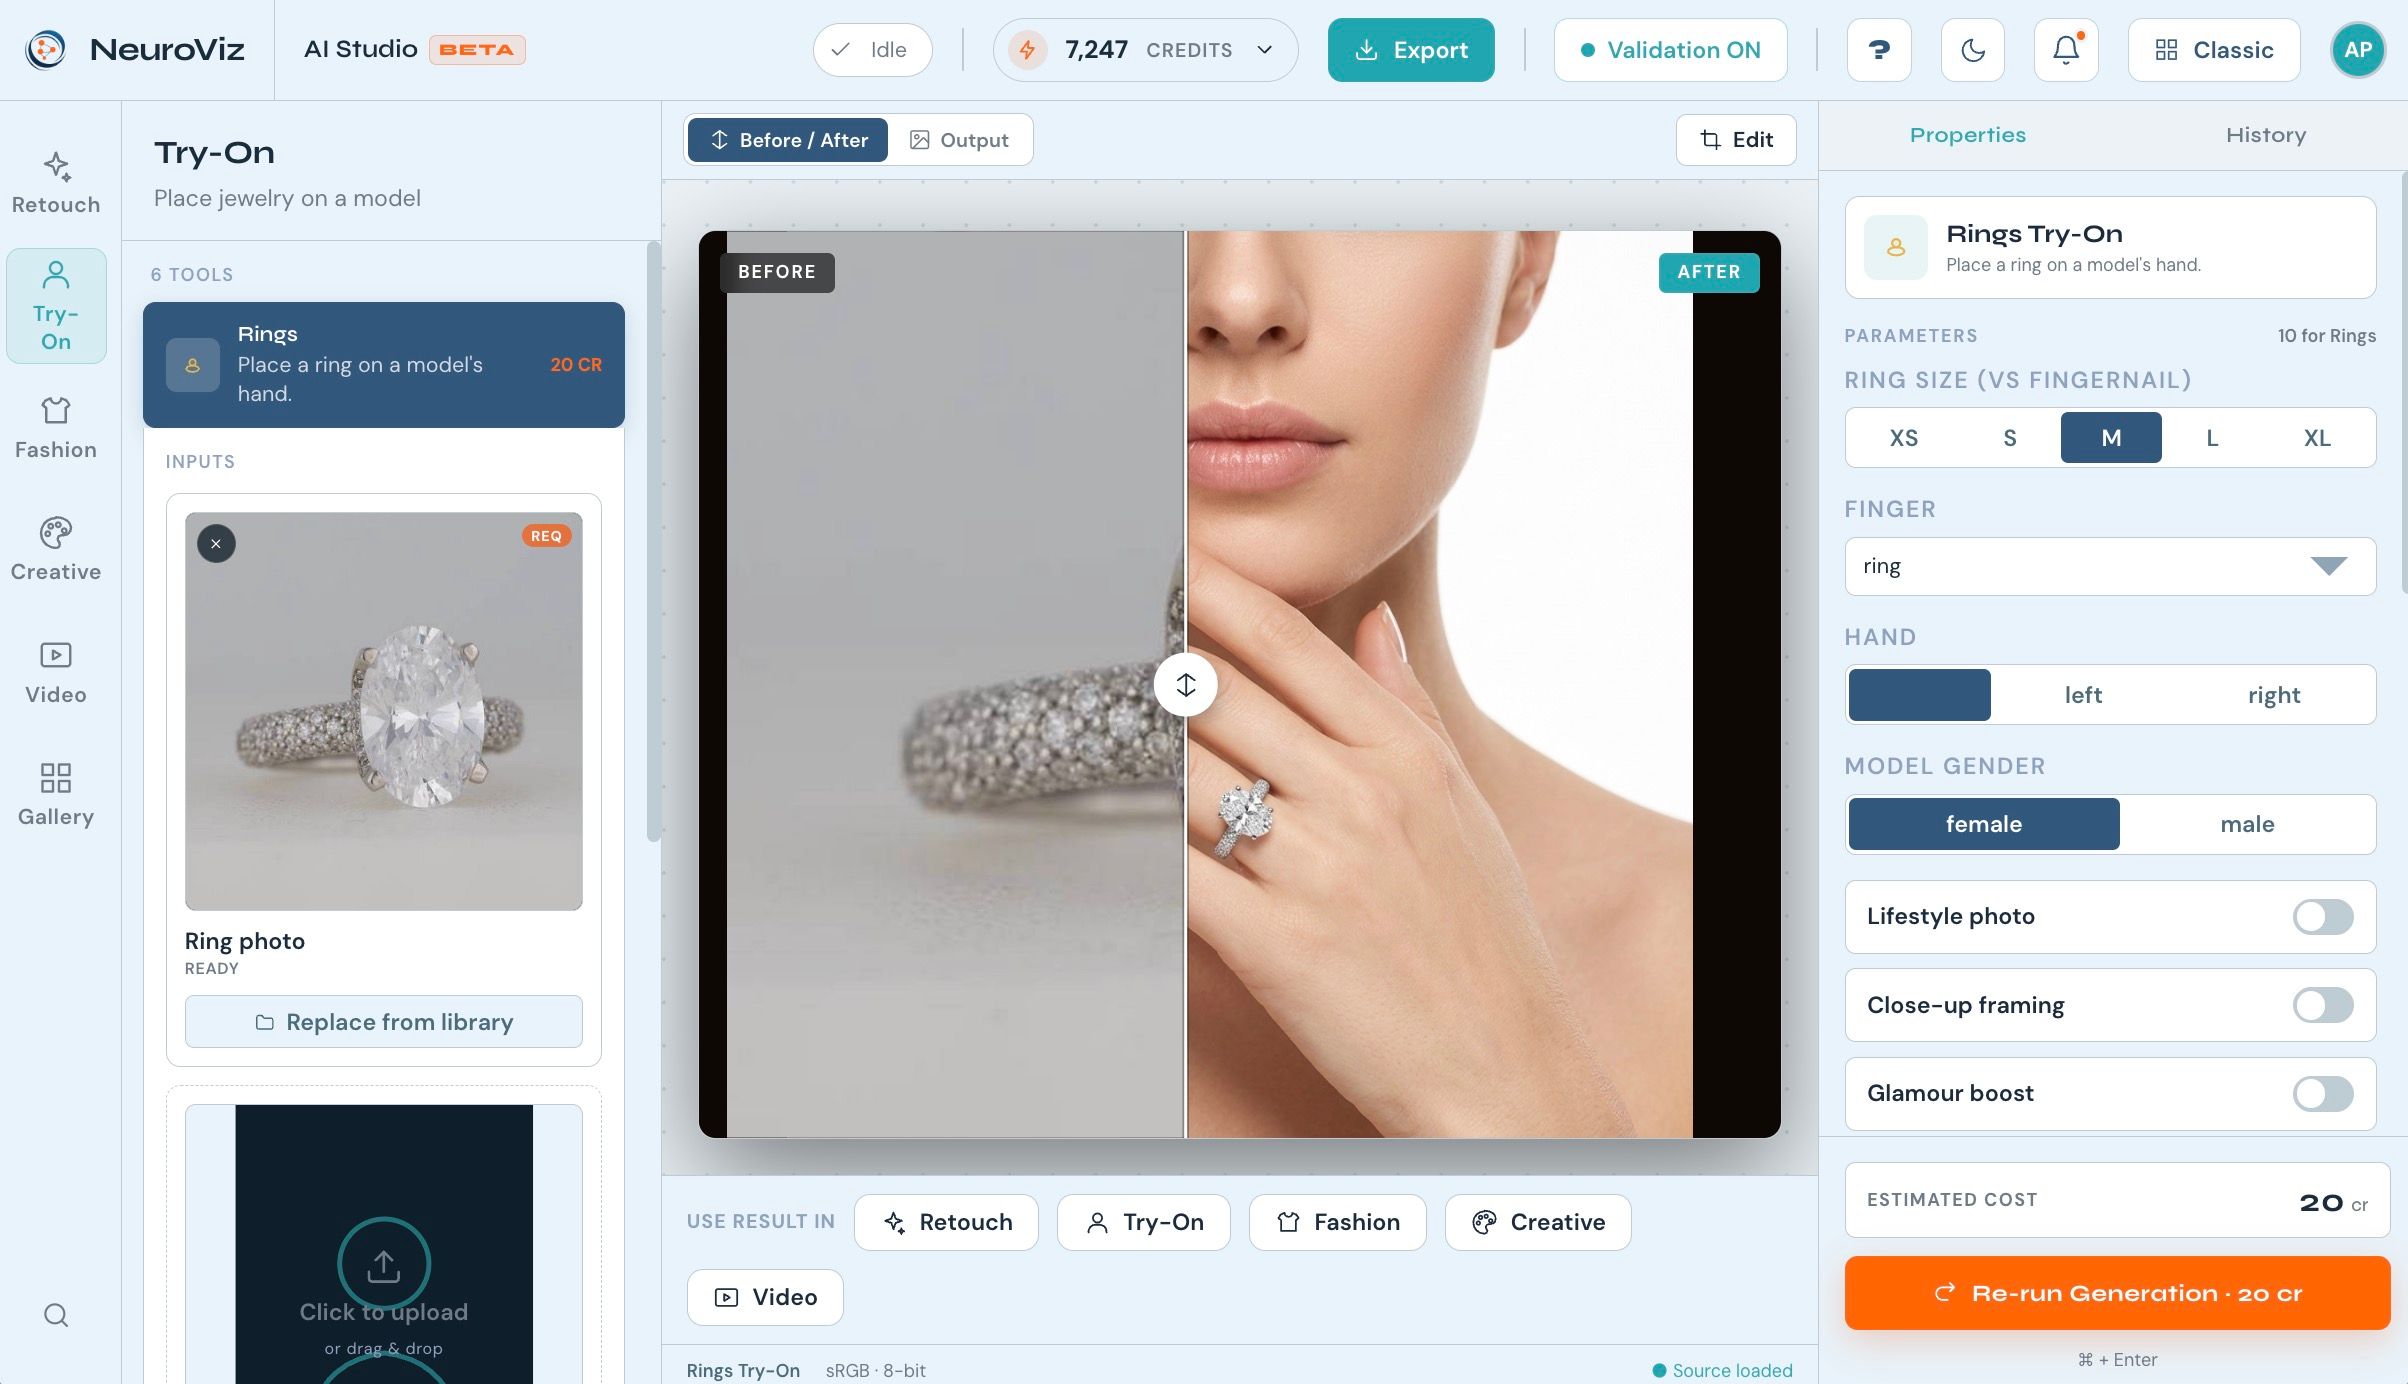
Use both — but make the on-model shot one of your first three photos. Flat lays show the product accurately; model shots sell the feeling and answer the #1 silent question, “how big is it on a real person?” If you can’t book models, this is the specific case where AI helps: photo-based try-on tools place your actual piece on a realistic AI model. NeuroViz Jewelry Virtual Try-On does this for necklaces, earrings, rings, bracelets, and watches from a single product photo.
Step 3: Editing — manual vs AI workflow
Editing makes Etsy photos consistent, and consistency is what makes a shop look professional. You have two routes:
Manual (free, ~10–20 minutes per photo): Snapseed or Lightroom Mobile — fix white balance first (metal color must be true), lift shadows, brighten the background toward clean white, sharpen slightly, crop square. Repeat identically for every photo.
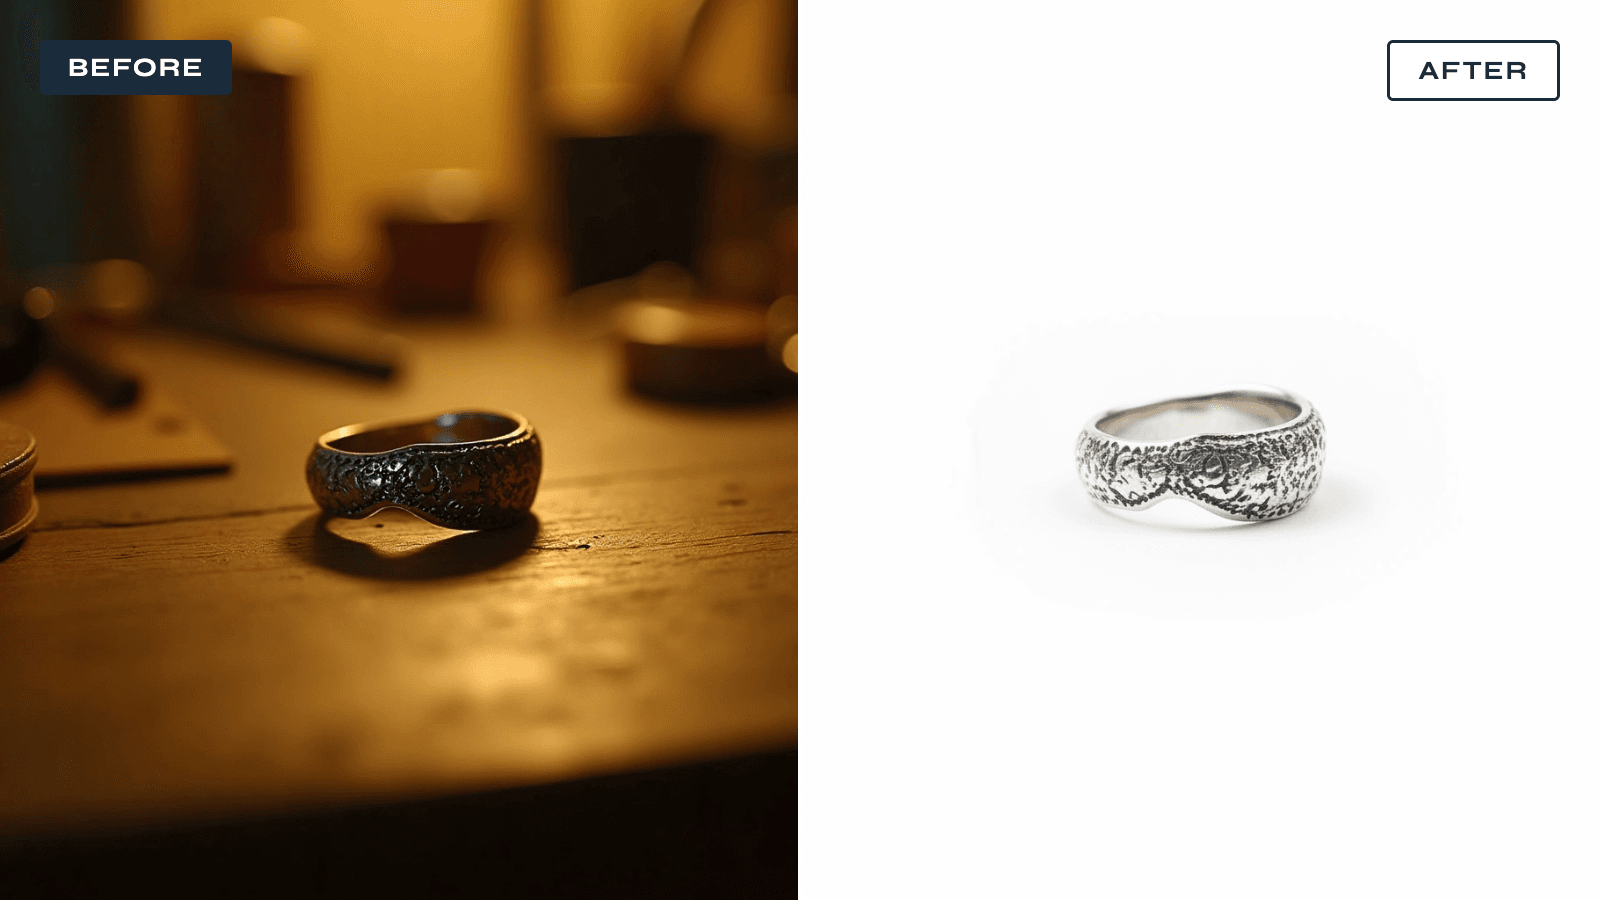
AI (seconds per photo, costs cents): jewelry-trained AI tools retouch dust and reflections, replace the background with clean white, and keep the metal and stones accurate. With NeuroViz AI Jewelry Retoucher, a typical retouch runs about 20 credits × $0.025/credit = $0.50 per image, and a phone snapshot comes back as a studio-grade listing photo. There’s a free trial with 80 credits — enough to test a handful of real listings before spending anything. For a deeper comparison of doing it yourself versus AI versus hiring a studio, see our AI vs traditional jewelry photography breakdown.
Is AI editing allowed on Etsy? Yes — Etsy permits AI-enhanced photos of real products as long as the images accurately represent the item you ship: don’t let editing change the apparent size, color, or materials. (Etsy’s disclosure rules target AI-generated artwork sold as the product itself — different situation from retouching photos of a real piece.) When in doubt, keep one unedited natural shot in the listing.
Common mistakes that kill Etsy jewelry sales
- Portrait-orientation hero photo → thumbnail crops it; centered landscape-safe composition wins
- Direct flash → white blowouts on metal, harsh shadows
- Lightbox-only diamonds → gray, lifeless stones (add the point light)
- Mixed backgrounds across a shop → looks like a flea market, not a brand
- No scale shot → returns and bad reviews from “it’s smaller than I thought”
- 3 photos in a 10-slot listing → buyers scroll to competitors who show more
- Wrong white balance → yellow gold that looks brassy, silver that looks blue
FAQ
How many photos should an Etsy jewelry listing have? All 10. Etsy gives you 10 photo slots plus one 5–15 second video; listings that use them give buyers more reasons to stay and fewer reasons to bounce.
What is the best image size for Etsy jewelry photos? At least 2,000 pixels on the shortest side (2000×2000 square is the safe default), 72 PPI, sRGB, exported as JPG under ~1 MB.
Can I use my phone to photograph jewelry for Etsy? Yes. A phone with macro mode, window light, a tripod, and consistent editing beats an expensive camera used badly. The lens matters less than the lighting.
How do I photograph jewelry without my reflection appearing in it? Tent the piece: surround it with white paper or foam board, leaving only a small gap for the lens. Shiny metal reflects everything around it — control what “everything” is.
Why do my diamonds look gray in photos? Fully diffused light kills facet fire. Keep the soft main light for the metal, then add one small hard light (LED pen light) angled at the stone until the facets flash.
Does Etsy allow AI-edited jewelry photos? Yes, for photos of real products — as long as the edited image accurately represents the item’s size, color, and materials. AI-generated artwork sold as the product itself has separate disclosure rules.
How much does AI jewelry photo editing cost? With NeuroViz, a typical retouch is 20 credits × $0.025/credit = about $0.50 per image, with an 80-credit free trial. A studio shoot for the same catalog typically runs $30–80 per photo.
Ready to turn phone snapshots into listing photos?
Shoot with the steps above, then let AI handle the editing: try NeuroViz free with 80 credits — retouching, white backgrounds, on-model try-on, and product video for that 11th slot, all trained specifically on jewelry.
Updated June 2026. NeuroViz is an AI jewelry photography platform used by 500+ jewelry businesses; see the honest comparison of AI jewelry photo tools for how it stacks up against alternatives.