Ai Jewelry Retoucher v.s Jewelry Retoucher PRO
High-quality product photos are essential for online jewelry sales. But what do you do when the source images aren’t perfect—or worse, poorly lit, blurry, or lacking detail?
At Neuroviz, we’ve developed two AI-powered tools to fix exactly that: AI Jewelry Retoucher Pro (Precision Retouching) and AI Jewelry Retoucher (Heavy Retouching). Both use advanced models, but are designed for very different tasks.
In this post, we’ll walk you through how to choose the right tool for your jewelry images—and show real examples to make it clear.At Neuroviz, we’ve developed two AI-powered tools to fix exactly that: AI Jewelry Retoucher Pro (Precision Retouching) and AI Jewelry Retoucher (Heavy Retouching). Both use advanced models, but are designed for very different tasks.In this post, we’ll walk you through how to choose the right tool for your jewelry images—and show real examples to make it clear.
When to Use Heavy Retouching?

Heavy Retouching is ideal when your original image is in poor condition:
- Blurry or out-of-focus Bad lighting or reflections
- Photographed in uncontrolled environments
- No professional retouching done
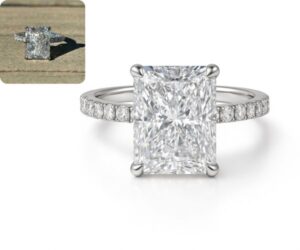
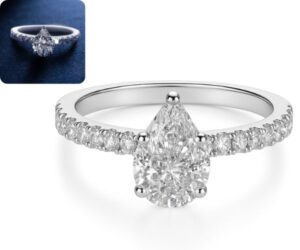
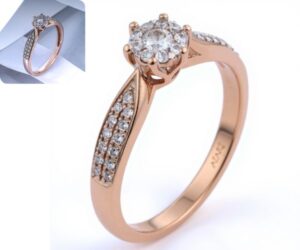
This tool uses an AI model that reconstructs and enhances the image, even when there’s not much to work with. However, because it re-generates parts of the image, it may alter small design features, especially with unusual or intricate jewelry.
💡 Use Heavy Retouch when your image is very poor, and the jewelry piece is relatively standard in shape and style.
Examples of correct use of “Heavy Ai Retouching”


When to Use Precision Retouching?
Precision Retouch is for images that are:
- Decent or well-lit
- Photographed with professional or semi-professional setup
- Contain non-standard, custom, or artistic jewelry designs
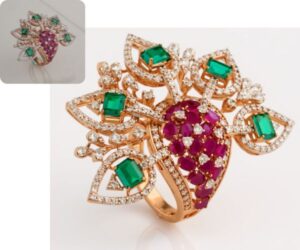
This tool preserves every detail. It doesn’t guess or recreate—it carefully enhances while maintaining the original structure and design.
💡 Use Precision Retouch when accuracy is crucial and the image already has visible structure.
Example:
A complex artistic ring with asymmetric elements kept all its shapes and surfaces intact. Small imperfections remained (like dust or mild scratches), but the end result was clean and true-to-original:


What We Learned from Testing:
Across several examples—including rings, earrings, and semi-transparent gemstones—we’ve observed:
- Heavy Retouching produces showroom-style photos but can alter unique features
- Precision Retouching keeps the product’s identity but won’t fix seriously flawed images
In one case, a very low-res image of earrings (500px wide) was significantly improved by both tools, but Heavy Retouching gave the more photogenic result—because of how little it had to work with.
How to Choose the Right Tool
| Condition | Use Heavy Retouch | Use Precision Retouch |
|---|---|---|
| Poor lighting | ✅ | ❌ |
| Blurry / low-res | ✅ | ❌ |
| Unique design | ❌ | ✅ |
| Studio-lit, but raw | ❌ | ✅ |
| Mass-market jewelry | ✅ | ✅ |
Try It Yourself – Free Credits on Signup
Both apps are available inside the Jewelry Suite on Neuroviz.ai. Every new user gets free credits to test.
Use the right tool based on your photo quality and the uniqueness of your product. That way, you’ll get accurate, professional-quality results—fast.
For more updates, you may check it here: What’s New on Neuroviz
Get Started with NeuroViz
Ready to try it out yourself?
You can start using our Guided Photo Generator for free!


